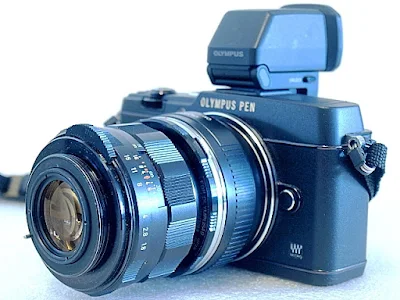
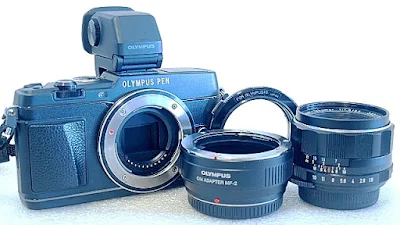
Digital reverse ring macro setup with a Super-Takumar 55mm 1:1.8 mounted on an Olympus Pen E-P5.
<< Click on image for enlarged Lightbox display >>
An inexpensive way to get close-up macro images without the need to use macro lenses is to use the reverse lens macro photography technique. The technique calls for the lens, a manual focus prime lens with an aperture ring control, to be mounted on your camera in reverse, i.e. with the front end facing inward towards the body of your camera.
Olympus Pen E-P5, Super-Takumar 50mm 1:1.8, Reverse Ring
These lenses are normally mounted via an adapter that has your camera's lens mounted on one side, and a screw thread equal to the diameter of the lens on the opposite side.
For my learning setup, I am using a Super-Takumar 55mm 1:1.8 lens, mounted to an Olympus OM/49mm reverse adapter, which is mounted to an Olympus OM Adapter MF-2 before it is fitted to the Olympus E-P5 body. It may sound a bit long-winded, but the constraint of what you have in terms of the bits and pieces required for the setup, does make sense and it works.
Olympus Pen E-P5, Super-Takumar 50mm 1:1.8, Reverse Ring
That's it for starting out images as posted, which were shot handheld. A fair amount of post-processing and print sharpening edits were needed to get them to where they are, with the main concern being the light loss with a smaller aperture opening for the slight gain in depth of field.
Shooting in a well-lighted environment, using a tripod to stabilize the camera, and setting shutter speeds that will eliminate camera shake are other concerns you should be aware of. More on that later.
VintageCameraMarketplace by ImagingPixel
Malaysia's Online Marketplace for Vintage Film and Digital Cameras, Lenses,
and Camera Accessories. Follow ImagingPixel on Facebook, Pinterest, and Twitter.
and Camera Accessories. Follow ImagingPixel on Facebook, Pinterest, and Twitter.


No comments:
Post a Comment