The system uses five autofocus sensors, located along the centerline of the viewfinder screen, to bring the subject into focus to the point where the eye is looking.
The eye-control feature is user-calibrated with settings for up to five different users or five shooting situations stored in the camera's memory, exclusive to Canon and the EOS 5. Operational controls of the EOS 5, including the three built-in metering modes, which are managed, or set, by a 2-dial system, first, the Main Dial located just aft of the shutter release, and the other, a Quick Control Dial on the film back. Exposure modes are controlled by the Command Dial on the top left of the camera.
The EOS 5 is also supported by features that include Silent Operation, built-in automatic Zoom Flash, AF-assist Light, pre-set autoexposure modes featuring 16-zone evaluative metering linked to the five focusing points, a 3.5% Spot Metering at the center of the screen, and Center-weighted Averaging metering. Exposure modes include Shutter-priority AE, Aperture-priority AE, Intelligent Program AE, Depth-of-Field AE, and Metered manual. An additional 16 Custom Functions for camera management are also available.
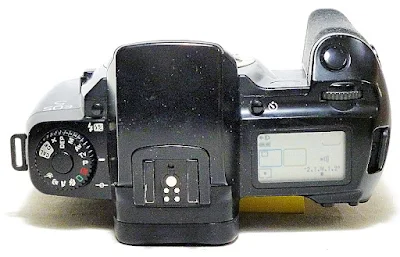
Technical specification of the camera includes a vertical-travel focal-plane shutter with an electronically controlled shutter speed range from 30 to 1/8000 second, and (B)ulb, with a maximum sync speed of 1/2000 second. The camera accepts film with an ISO speed range from 6 to 6400 (user set) and DX-coded from 25 to 5000. An LCD panel on the right of the camera displays information including Frame Counter, AF mode, Film Winding mode, Metering mode, Shutter Speed, Aperture value, Film Speed, Battery condition, and Exposure Compensation.
The camera weighs 665 grams without a battery. The power source is a 6-volt lithium 2CR5 battery or an optional Canon BP-5 Battery Pack, which uses D batteries attached to the photographer's belt. An added versatility for the EOS 5 to be used in portrait orientation can be enhanced with the VG-10 Vertical Grip, which adds an additional Shutter Release, Control Wheel, AE Lock button, and Focus Point Selection to the bottom of the camera.
Basic Camera Features
Though designated as a 'semi-professional,' the EOS 5 enjoyed a solid rapport with professional photographers as well, which played a strong part in the push that put Canon at the front of the competitive 35 mm SLR film camera market in the 1990s.
A decidedly plain front, with only the handgrip to the left, and the Shutter Release button on the top of the ledge. The lens release button is to the middle right of the lens mount.
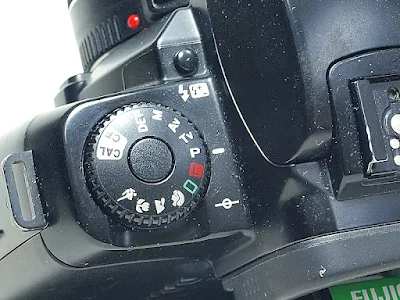
On the top plane, to the left, is the Command Dial, with the Flash Pop-up button sitting on the ledge on the front. The push-the-central button to release Command Dial is arrayed with exposure selections for Program AE, Shutter-priority AE, Aperture-priority AE, Manual Exposure, Depth-of-Field AE, and Flash Sync Mode in the upper Creative Zone, separated from the lower Image Zone by the Calibration and Camera Lock menu selections. The Image Zone has selections for Full Auto, Portrait, Landscape, Close-up, and Sports shooting modes.
Slightly left of the middle of the top plane is the built-in flash and pentaprism hump, with a hot shoe at its apex, and the viewfinder eyepiece assembly on the back. On its right is the LCD panel, with its full content displayed above, but showing only in-use functions and camera settings when the camera is in use. On the ledge in front of the LCD panel is the Self-Timer button.
On top of the hand grip is the Shutter Release button, with the Main Dial just aft of it. The Main Dial is used to adjust the shutter speed in Shutter-priority AE and the lens aperture in Aperture-priority AE. In Full Manual mode, the Main Dial is used to adjust the shutter speed, while the lens aperture opening is handled by the Quick Control Dial on the camera back.
On the back of the camera's top plane is the Viewfinder Eyepiece, aligned with the pentaprism hump, while on the right edge of the camera top, beside the thumb-rest area, are the AE Lock/Custom Function and AF Point Selection buttons.
To the left end of the hinged film back is the Film Check window, and to its right, an array of four vertically aligned function set buttons. Used in conjunction with the Main Dial to adjust the setting, the buttons are for function settings for:
- Drive - For selecting Single, Continuous, or High-speed exposure modes,
- AF - For selecting One-shot AF, or AI Servo AF focus modes,
- Metering - For selecting Evaluative, Spot, or Center-weighted Average metering modes,
- Function - To rotate between AEB (Auto Exposure Bracketing), Red-eye Reduction, Beeper Setting, Multiple Exposure, and film ISO film speed, with settings adjusted with the Main Dial.
The Quick Control Dial, located on the film back, engages when the smaller Quick Control Dial Switch is set to 'I (On).' The dial is used to adjust Exposure Compensation when shooting in AE mode and to adjust lens aperture opening when shooting in Full Manual mode.
On the bottom plane, the Tripod/Vertical Grip Socket, Vertical Grip Connector Cover, and Vertical Grip Positioning Hole.
Film Loading and Rewinding
Film loading and rewinding are straightforward on the EOS 5. First, set the Command Dial to a position other than 'L,' open the camera back, and drop the film canister into the left chamber with the flat end facing up and the opposite end entering first. Next, pull the film tab end all the way across the film box until the tab end is aligned with the orange mark in the film take-up spool area. Make sure that the film is evenly flattened across the film box before closing the film back.
The camera will automatically advance the film to Frame 1, and you are ready to go! The film will rewind automatically at the end of the roll.
Viewfinder Readout
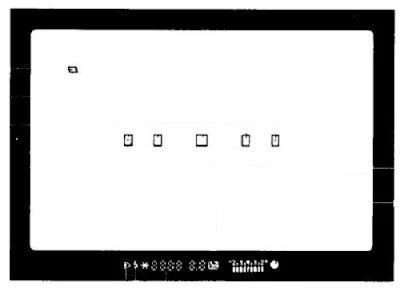
The viewfinder of the EOS 5, with 92% vertical and 94% horizontal coverage, is fitted with a standard Matte Screen with only the 5 AF Focus Points indicated across the middle of the screen, and a Depth-of-Field Check mark toward the top left corner of the screen. Based on the camera setup, one or more of the five AF Focus Points will light up to denote the point that is active when the shutter release on the camera is half-pressed.
The only other visible information source is the LCD bar on the lower part of the screen, which displays, from left to right, the Eye Controlled Focus mode indicator, Fast Charge completion indicator, AE Lock indicator, Shutter Speed, Depth-of-field and Calibration setting indicator, Aperture value, Flash Exposure Compensation mode indicator, Exposure display, and In-focus indicator.
Eye-Controlled Focus
The Eye-controlled Focus feature of the EOS 5 enables the camera to automatically detect the area of the viewfinder screen where the eye is looking and bring the focus to the subject at that point. The feature, however, must first be calibrated to the individual's eye characteristics (pupil size, use of contact lenses, eyeglasses, etc.) before it can be put to use. Up to five numbered calibrations (1 to 5) can be stored in the camera's memory.
The calibration process may seem intimidating, but worry not, it is fairly straightforward:
- Step 1 - Set Command Dial to 'CAL' - The top line of the LCD Display should display 'OFF.'
- Step 2 - Rotate the Main Dial to the desired calibration number, from 1 to 5 (Number blinks if it has not been set).
- Step 3 - Hold the camera to your eye, look at the blinking far right AF point, and press the shutter button. A double Beep denotes that calibration to the right AF point is successful.
- Step 4 - Next, look at the blinking far left AF point, and press the shutter button again. A double Beep denotes that calibration to the left AF point is successful. Done.
To use, bring the camera to your calibrated eye, frame the image, look at any of the five (5) focus points on the viewfinder screen, and half-press the shutter release. The focus of the image will be adjusted to the object at the point, and if you are happy with the composition and other settings, release the shutter fully.
The Eye-controlled Focus feature can be used on all shooting modes of the EOS 5 except for Full Auto and Depth-of-Field AE.
Alternative Focus Point Selection
Aside from the Eye-controlled Focus feature, the EOS 5 can also be used with the following focus modes:
- Automatic Focus Point Selection - The camera selects the AF Focus Point(s) based on the prevailing image environment in the Creative Zone. To activate:
- Set Command Dial to 'CAL' - The top line of the LCD Display should display 'OFF.'
- Frame the image in the viewfinder, press the AF Selection Button, and rotate the Main Dial until all five AF points light up.
- Set the Command Dial to the required shooting mode, and you're ready to go.
- Manual Focus Point Selection - Set the AF Focus Points individually, which can be selected using the Main Dial. To set:
- Frame the image in the viewfinder, press the AF Selection button, and rotate the Main Dial to select the AF point.
Metering Modes
The Canon EOS 5 provides access to three metering modes: Evaluative Metering, Spot Metering, and Center-weighted Average Metering. These modes are selectable by pressing the Metering Mode button (third down of the aligned four on the film back) and by rotating the Main Dial to get to the required selection.
- Evaluative Metering - For general subjects, the exposure setting will be based on the focus point in use.
- Spot Metering - Metering is limited to the central 3.5% area of the viewfinder screen. The mode is recommended where there is a big lighting condition difference between the subject and background areas.
- Center-weighted Average Metering - Metering is averaged over the entire image frame with emphasis placed on the central area.
Exposure Modes
Exposure modes on the EOS 5 are separated into two zones: the Creative, and the Image Zone. The two are separated on the Command Dial with selection for Calibration and Custom Functions on one side, and the Camera Lock function on the other. The Camera Lock will also indent-lock the dial.
- Creative Zone:
- P (Programm AE) - The camera sets both Shutter Speed and Lens Aperture automatically based on the lighting environment of the framed image.
- Program Shift Function - A feature that can be used to 'shift' the shutter speed/lens aperture combination without changing the exposure value. The values are shifted by using the Main Dial with the reference readout shown on the LCD bar at the bottom of the viewfinder screen.
- Tv (Shutter-priority AE) - The camera will set the lens aperture opening automatically based on the exposure metering with a pre-set shutter speed.
- Av (Aperture-priority AE) - The camera will set the shutter speed automatically based on the exposure metering with a pre-set lens aperture opening.
- M (Manual Exposure) - Images are captured with both shutter speed and lens aperture opening set by the user. Changes to the shutter speed are made with the Main Dial, while the lens aperture opening is adjusted by rotating the Quick Control Dial on the camera back.
- DEP (Depth-of-Field) AE - This mode will place all subjects located between two (foreground and background) focus points manually defined by the user into focus. The mode is activated by first setting the Command Dial to DEP, next by manually picking the near and far focus points with the Focus Point selector, and finally by executing the image capture.
- The Program Shift Function is also available in DEP AE mode.
- X (Flash Sync Mode) - This mode is set for use with a non-dedicated external flash source. Shutter speed and lens aperture settings are reversed in Manual Mode selection, with the X-sync shutter speeds (1/200, 1/125, 1/90, or 1/60) set with the Quick Control Dial and lens aperture setting with the Main Dial.
- Image Zone:
- (Full Auto) - A point-and-shoot auto mode with all parameters (Focusing, Exposure, Pop-up Flash, Red-eye Reduction, One-Shot AF or AI Servo AF, and Film Winding) is set automatically by the camera. Program Shift and Eye-control Focus are not available in this mode.
- (Portrait) - Mode for shooting landscapes with a sharp focus across the range of distances.
- (Close-Up) - Mode for using the camera with a macro lens.
- (Sports) - Tode for events or fast-moving sports. Focus tracking is activated when the shutter button is pressed halfway. Continuous shooting is executed when the shutter button is pressed and held.
Winding Up, Part I
Well, so much for what is meant to be a brief overview. I might be going overboard here, but with a camera of such fine complexity, extraneous features, and a lot more to write about, I might as well expand this overview to a couple of pages more... (maybe later)
The Eye-controlled Focus of the EOS 5 is not alone, as it seems that, 30 years after its introduction, the feature has surfaced again with the Canon EOS R3. Catching up with this page, thus, is a good read to start having a better understanding of the feature.


No comments:
Post a Comment